
Using any writing app unfamiliar to you can be intimidating. Believe me, I know. The first time I tried Scrivener, my heart was racing. Like, I felt like I was on the brink of a panic attack because I had no idea how to use it.
I did do basic research and everything, but mostly, I just learned to use it by doing it. And I loved the structure of it, and how after you’ve finished drafting a novel, you could export it in a manuscript format to Word. I was so awestruck by that after I wrote a final iteration of Project Dumpster Fire in 2019.
Then I used it more often for other projects such as THE CURSED ONES and DARK EXPOSURE (and now this new one).
I could go into nitty gritty detail of how to use Scrivener, but I’ll just get into the basics of it and review the things I use the most.
Install and register the program
The first thing you’re going to do is buy and install the program. Yes, you must buy it to use it. It’s a one-time purchase ($50, I believe) and it comes with a registration code you can use to install it on other computers you own or may own in the future.
Once you’ve finished installing, you can jump right into opening it up and typing in the registration code which will come in your purchase confirmation email. SAVE THAT EMAIL.
You now have Scrivener on your computer… now what?
Create your first document
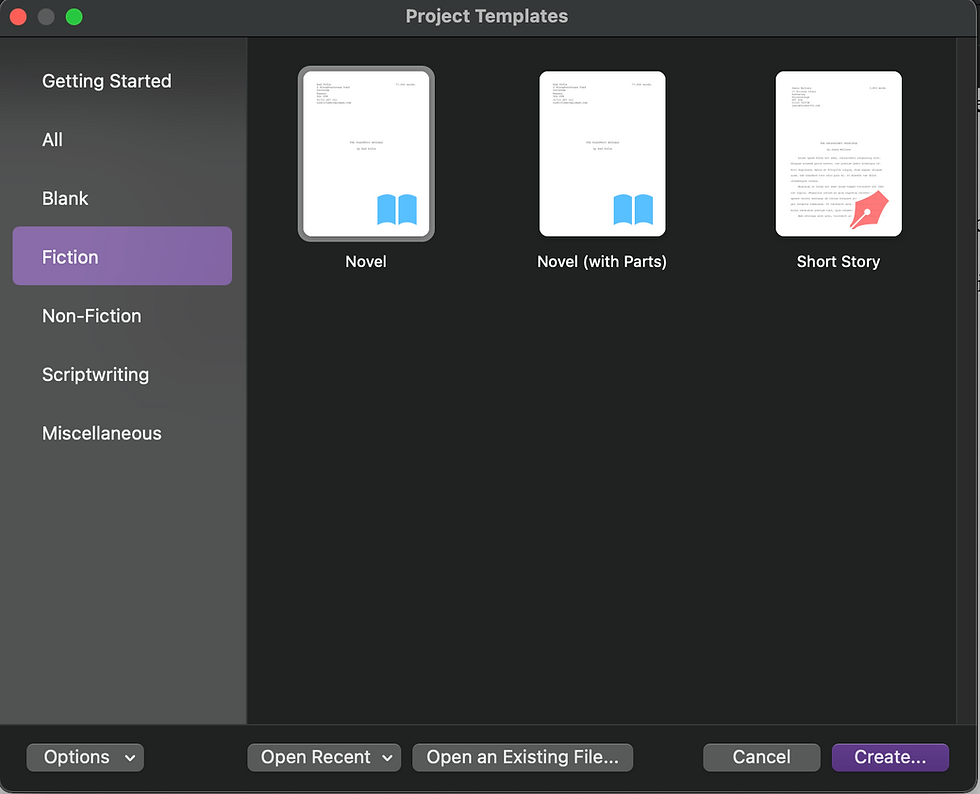
Open the app and a pop up will appear for you to choose from various Project Templates. I tend to choose from the Novel (with Parts) template to write my stories because somehow, my books always end up with Parts lol.
From there, you can start typing up your story!
Stylizing your document with fonts and spacing
If you’re like me, you like writing with a certain kind of font and spacing. For me, it’s Times New Roman (12 point font) and double spacing… I know, how boring. But I love that font lol.
I use a MacBook Air, so I don’t know what the Windows version is like for Scrivener, but to set up your manuscripts font and spacing, here’s what you need to do:
On the upper menu, go to Scrivener then select Preferences and click on Formatting under the Editing tab.

Click on the little “Aa” above the text box and choose your font of choice. After that, go over to the spacing and choose the spacing of your choice.
Super easy, no need to hit save or anything. Just X out and go forth and write!
Setting up a deadline and daily word count
I know some writers love to have their daily word count set up, plus having a deadline. It sounds stressful, but it keeps me accountable.
So, if that’s something you want to do, go to the upper menu, and click Project then select Project Targets.
A little pop up will appear and to set up your daily word count and deadline, what you’ll need to do is add in the total amount of words you’ll want to write in the first half of the pop up. For me, I usually put in 50,000 just to get me over that “I wrote a novel” hurtle, then I’ll keep adding until I know the book is done.
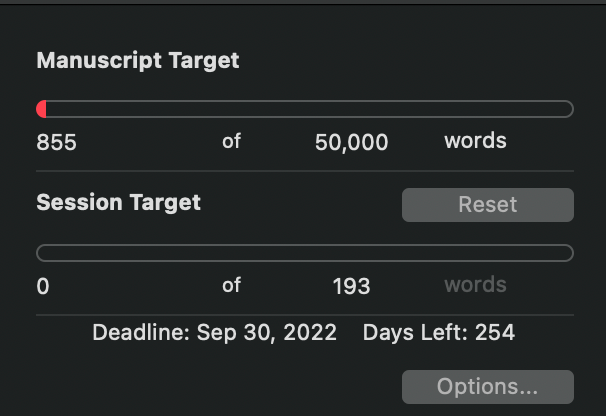
After you’ve determined the number of words you’re going to write, click on Options and set your deadline on the first page of the new pop-up that will appear under Draft Target.

In the same pop-up you’ll want to toggle over to Session Target. To get the word count portion to appear on the top bar of the application like so…

…tick off Automatically calculate from draft deadline. And you can set your writing days if you want to get a word count.

NOW, you’re ready to write!
Exporting your manuscript
Congrats! You finished your manuscript! What I recommend doing before you put your book away and focus on something else (like relaxing, reading, etc.) is exporting it to your computer. That way, when you’re ready to look at it again, it’s there waiting for you!
So, head over to File then go down to Compile. A little window like this will pop up then just press Compile… and presto! Your completed manuscript is now on your computer!

Note: I suggest putting the format in Word Document
Other fun things (page view, Name Generator, etc.)
If you're like me and you like knowing how many pages you're writing in a chapter, here's how you can have your editor split up into a page view.
Go to View on the top menu and hover over Text Editing and from there, you'll see Page View. Click that and your editor will be condensed to a regular printed page and split as such as you type.
For other fun things like the Name Generator, go to Edit on the top menu and hover over Writing Tools. The Name Generator is at the bottom and from there, you can toggle with all the different options from Polish Surnames, Literary Names, etc. It's one of my favorite features!

Comments